Blog Post
Excel - Transpose Columns & Rows


Make Rows the Columns and Make Columns the Rows In an Excel Worksheet
Have you ever found that you have a worksheet with a table of data on it, but you would really like the rows and columns to be switched round? In other words you would like to transpose the columns and rows.
Well this is a really easy thing to do in Excel. There is a transpose feature on the Paste menu.
In the following example we will switch years and months round. Currently the years are on the columns and the months are on the rows, but we will swicth them round so that the years are on the rows and the months are on the columns. The following screen shot shows the before and after tables:
Copy and Paste
So how do we do it? With the following simple steps:
Highlight (select) the whole table or data region so that all columns and rows to be transposed are included in the selection.
Copy the selected area to the clipboard with C or right click and choose copy
Click in the cell you wish to paste the transposed table into
Activate the Paste Special feature with V or right click and choose Paste Special from the pop up menu (right click menu shown below)
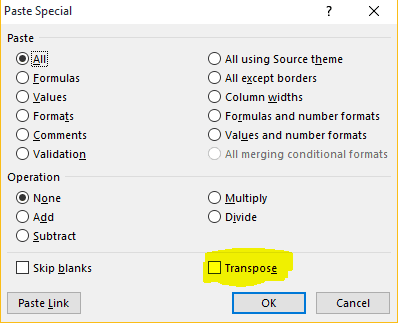
Select Transpose form the Paste Special dialog as shown below, and that is it!
The data will now have been pasted with the rows and columns transposed, as shown in the first screen shot.
If you would like to learn more about working with Excel get in touch at info@ptr.co.uk or take a look at our Microsoft Excel Training Courses.
Share This Post
Mandy Doward
Managing Director
PTR’s owner and Managing Director is a Microsoft certified Business Intelligence (BI) Consultant, with over 35 years of experience working with data analytics and BI.
Frequently Asked Questions
Couldn’t find the answer you were looking for? Feel free to reach out to us! Our team of experts is here to help.
Contact Us


