Blog Post
Microsoft Access Forms – Parameter Queries, Macros & Buttons

Adding Buttons & Macros to an Access Form
Adding a Button to an Access Form using the Command Button WizardAdding an OpenQuery Macro to an Access Form
Adding a Button to an Access Form using the Command Button Wizard
- Create a new or open an existing Access Form
- Go to the Design View
- Select the Design Tab from the Form Design Tools Contextual Tab
- Select a button from the Controls Group
- Once you’ve added the button the below window will pop up:
- Select the Category and Action you want to use. The above example shows an action to run an existing query.
- Click Next
- For any actions where you need to select an Object, (Table/Query/Form/Report) you will be taken to another window, pictured below:(If you don’t need to select an object, when you press next you will be taken to step 11)
- Select the object you want
- Click Next
- You will then be taken to the window below:
- From here you can choose to have a button showing specific text, or a picture either from the list shown, or you can browse:
- Click Finish
To test your button, view your form in Form View and click on the button. (There is an example picture of the Form with a button below.)
Adding an OpenQuery Macro to an Access Form
There are many reasons why you may wish to add a button to an Access form, and this is the first in a number of examples that we will go through.
One reason you might want a button, is to run queries, so that you can view your data in different ways. Not only that, but when you run these queries, you want the data to be dynamically filtered. I was recently asked how to do this:
You can create multiple queries to manipulate all the data you wish, and then in the criteria section of the specific field you wish to filter add a parameter, so that the user can specify what they want to be shown. Then, you can attach these queries to buttons or labels on a form, with a macro which opens queries.
e.g.
Add the Parameter to the Criteria section, of the relevant field in Query Design View:
When you run the query, the parameter will appear as:
Simply type in the value you wish to see. (In the example above it would be records related to the CustomerID you wish to view)
Then to attach it to the form button:
- Select the button/Label
- Open the Property Sheet
- Select the Event tab
- Click into the On Click box
- Select the three dots:
- Choose the Macro Builder
- Select from the drop down Open Query:
- Select the query you wish to run, and how you want them to view the data.
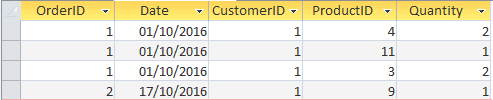
Once you’ve returned to the Form View, you can test your button, it should look similar to the example below. My Form is based on customer data. I created a button that will run a query, to show order details related to a specific customer.
When I click on the button, it runs the query, and asks me which customer I would like to see data related to. It then displays the data sheet you see pictured below. (Remember, you are asked which customer you wish to see, because of the Parameter you created.)
In this example you have been shown how to add parameters to a query, to enable you to dynamically manipulate the view of your data.Every time you click the button, you need to provide the query with a CustomerID. This process can be automated so that the query will run, and base its results on the CustomerID presented on the form. This will be covered in a separate blog, so keep your eyes peeled!
To learn more about Microsoft Access Forms and manipulating your data, join us on one of our Microsoft Access Training Courses.
IR
Ian Roberts
Technical Director
Ian is an incredibly talented solutions architect. He has over 15 years of experience working with data, as part of a broader IT career spanning over 20 years.


Frequently Asked Questions
Couldn’t find the answer you were looking for? Feel free to reach out to us! Our team of experts is here to help.
Contact Us